Low Poly Aircraft Modelling Tutorial
Results 1 to 25 of 38

Thread: Low Poly Aircraft Modelling Tutorial

Hybrid View

  1. #1

    Low Poly Aircraft Modelling Tutorial

    In the following I'm reposting Gerard's tutorial here that has been available at Netwings. Netwings apparently is no longer and as most of you know Gerard has passed away early this year. so before it all gets lost.....


    Edit:
    the images have disappeared, so an old copy of the tutorial has been uploaded to the Library in PDF format, complete with screenshots.

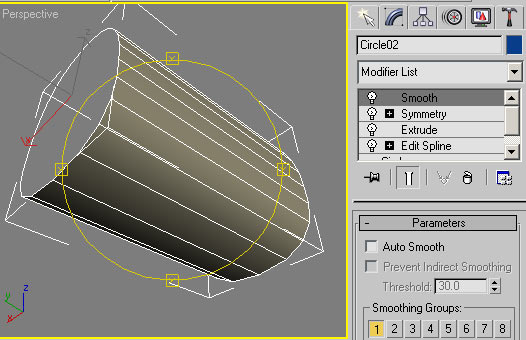
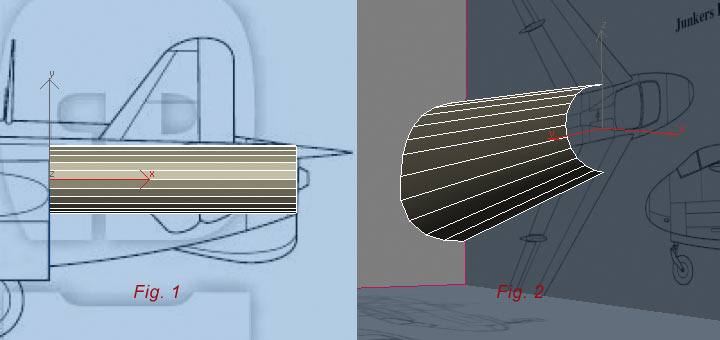
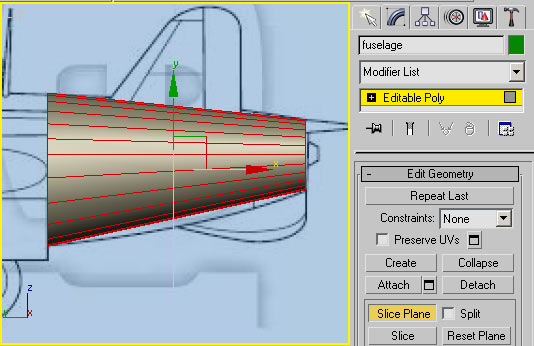
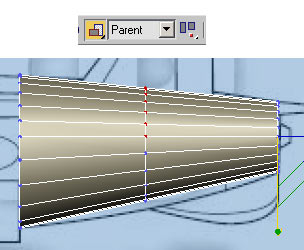
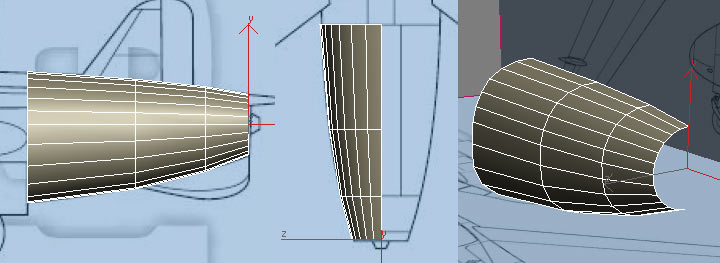
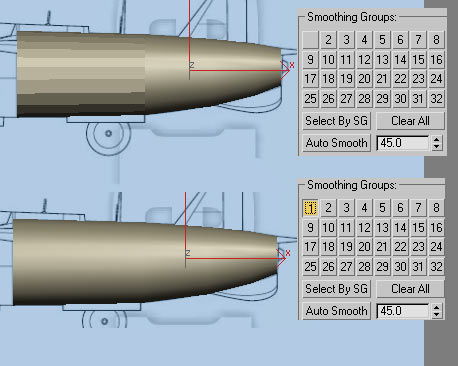
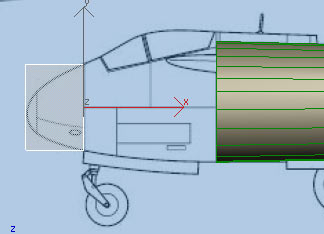
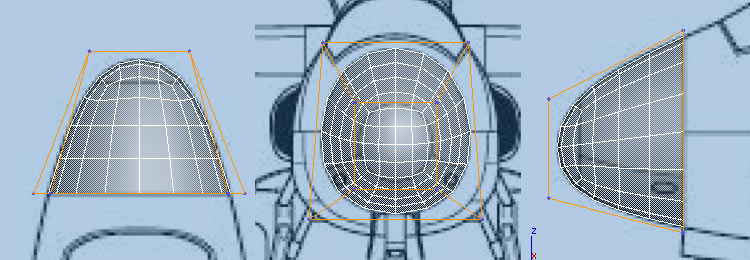
    Gerard's Low-Poly Modelling Tutorial

    (up when the library has looked it over)
    Last edited by hairyspin; October 18th, 2017 at 13:40.
    Mathias


  2. #2
    INTRODUCTION

    Johann Steve recently asked me to help out with building a Junkers EF128. I had a quick look and realized that I could "kill two flies with one blow" as I had promised to write an aircraft modelling tutorial earlier this year. The Ju128 is a suitable subject for a tutorial; a quick build but with a few complex curves and interesting detail. I will try to post something every day, build the aircraft as I go along. I use 3ds max 7 but I'll suggest workarounds for tools gmax doesn't have.

    This tutorial is meant for the intermediate (g)max user who already has a basic knowledge of the software's user interface. Don't hesitate to ask questions though, quite a few helpful people hang out here.

    REFERENCE MATERIAL

    Well, there's one reason why the Ju128 is a very bad choice: lack of references. However, it's a typical Luft'46 plane, one that never left the drawing board, which means we will have quite a bit of, er, artistic license. A mock up and windtunnel models were made though, they can be seen here:

    http://www.luft46.com/junkers/juef128.html

    Nevertheless, would you normally base a project that will take many hundreds of hours on one crappy 3-view culled from the net? No way, you would cross reference several sets of high quality drawings (which will all contradict each other) and gaze at hundreds of photo's!

    PREPARATIONS

    One question that pops up from time to time (on sim modelling forums as well as the Discreet/Autodesk web board) is: "What's with the perspective viewport, small parts disappear when I zoom in?!" The reason is simple: the (g)max viewport "camera" just cannot cope with the very large and the very small at the same time, so, it's important you choose your system unit wisely, not only to get rid of viewport clipping, but also to get interactive tools like chamfer to work properly. Check Family Fare Ad and Fareway Ad. I usually set 1 system unit = 1 centimeter for aircraft work, and 1 millimeter for small intricate stuff like cockpit instruments. Now, I know the MS SDK's want you to use 1 meter scenes but there's an easy solution to that: set up a 1 meter scene purely for export and merge your 1 centimeter work into it, easy as pie.

    As to setting up a backdrop studio... it all depends on personal preferences. Personally, I don't like to fiddle with mapped boxes; too much work and not flexible enough. Neither do I like to straighten drawings out (scale, rotate) in Photoshop, as resampling degrades image quality. I just copy and paste the left, top, front, etc. views onto square 512, 1024 or 2048 pixel canvasses - depending on drawing size. Then I create a new layer, fill it with pure blue and set opacity to 30%.

    In 3ds max I activate the top viewport and draw a box by typing in the aircraft dimensions in the Box primitive Keyboard Entry rollout and hit Create. Next I check See-Through in Display Properties (Display tab of the Command panel or right-click > Properties). Once I have the dimensions box I can draw and map square backdrop Plane primitives in the appropriate viewports and move/scale/rotate them until the drawings fit the box. Lastly, I uncheck Show Frozen in Gray, in Display Properties and freeze the backdrop planes.

    Last edited by hairyspin; October 15th, 2017 at 12:04.
    Mathias


  3. #3
    THE FUSELAGE

    Looking at the left view we can make out four logical fuselage sections: a nose "cone", cockpit, mid and aft section. At each section the fuselage changes shape. In the early phase it's important not to add / think more sections than needed.


    Some Spline Kung Fu

    I think we can assume section D to be circular, which makes it a good starting point. Create a Circle Spline in the Back viewport, use Keyboard Entry; it will perfectly center the circle. Use the Left view to move the circle into position. In the Modify panel you can adjust the radius. There's also an Interpolation rollout, open it and drag the Steps spinner down to 0: the circle changes into a rectangle. This is important: the software uses intermediate steps to define curvature. The more steps, the better the spline approximates a true curve. Set Steps back at 6.

    Next, apply an Extrude modifier to Circle01, set Amount to 70 cm or so and uncheck Cap Start and End. Now, the resulting mesh is rather dense for a low-poly model but the object stack allows us to go back to the circle spline and set Steps to 5, this gives us a 24-sided cylinder:


    Section B is next as it is, at least for a large part, visible in the front view drawing. In the Left viewport, select and move Circle01 to the left (along the view x-axis) while you hold down the SHIFT key; tick Copy in the Clone Options window and click OK. In the Circle02 object stack window, select the Extrude modifier and delete it. According to the Luft'46 info, fuselage width is 1.27 m, so we'll change the radius to 63.5 cm. Apply an Edit Spline modifier, select the bottom vertex and move it down until it reaches the bottom line of the drawing. As for the top vertex, we're not going to move it up to the top of the canopy but to the top of the "true" fuselage:


    With the Back viewport active, go to Segment sub-object level, select the left half of the spline and delete it. Go to vertex sub-object level, select the bottom vertex and drag its tangent handle (little green square) to the right until the spline nicely fits the fuselage "belly":


    Next, select the mid vertex, drag its bottom handle a bit to the right and the vertex itself a bit to the left. Do not move the mid vertex up or down (I'll explain later). Lastly, adjust the top vertex handle until you end up with something like this:


    Nice, but not perfect. We need to be able to independently move the mid vertex' tangent handles. Select the mid vertex, right-click it and choose Bezier Corner in the quad menu. Now you can move one handle independent of the other:


    Circles have Bezier type vertices by default. There are four different types; in vertex sub object level, right-click any vertex and you can set vertex type to:

    Smooth: Nonadjustable vertices that create smooth continuous curves. The curvature at a smooth vertex is determined by the spacing of adjacent vertices.

    Corner: Nonadjustable vertices that create sharp corners.

    Bezier: Adjustable vertex with locked continuous tangent handles that create a smooth curve. The curvature at the vertex is set by the direction and magnitude of the tangent handles.

    Bezier Corner: Adjustable vertex with discontinuous tangent handles that create a sharp corner. The curvature of the segment as it leaves the corner is set by the direction and magnitude of the tangent handles.

    Right, let's see how this thing shades. I've Applied an Extrude, Symmetry and Smooth modifier, and assigned a material with a fairly high specular strength:


    Not bad but edge/vertex distribution could be better; vertices are too far apart at the bottom and too close together at the sides... Next time we will do something about it. We will also start working with the Editable Poly, oh, and finally build something that looks like a fuselage.

    The Editable Spline is your friend though: you can draw fuselage cross sections (as well as wing airfoils), extrude them, convert to Editable Poly and work from there. I must admit however that I almost never use Bezier vertices; I just put a (corner type) vertex where I want an edge and keep Interpolation at 0. More on that later.

    TBC

    gh
    Mathias


  4. #4
    Here's the basic fuselage mesh. Edges flow nicely, even around the cockpit cut-out and there's only four triangles, the rest is all quads. The nose shades beautifully thanks to [gasp] Subdivision Surface... Normally I wouldn't use subdivision because of the high poly counts involved but for a nose like the Junkers' it's perfect, and economical too: 112 faces for the nose tip, out of 576 total:


    It went as follows. I copied and modified Circle02 to get section C. I converted Circle01 (section D) to Editable Poly, selected the left edges, clicked the Align button (toolbar) and picked section C. I left everything at default settings and hit OK (Fig.1). Next I deleted the right half of Circle01 and changed its name into "fuselage". Using section C as a template I moved the fuselage vertices into position. For the top half I used 3D vertex Snap, the bottom half I moved by hand because I wanted better vertex distribution there (Fig.2):


    I selected all polygons, clicked the Slice Plane button and moved the plane to where I wanted a new edge loop, and clicked Slice:


    Now comes the really important part: the new edges and vertices need to be scaled so select the top 7 vertices in the Left viewport (I like to work with vertices but you can use edges too of course), click Non-uniform Scale, select Parent as reference coordinate system and choose Use Transform Coordinate Center:


    This way, and only this way, we won't mess up the flow of edges while scaling. Now, one could yank the vertices or the Transform Gizmo but I prefer to drag / click a spinner in the Transform Type-In (hit F12), in this case the Offset: Parent Y spinner. It'll give you better / more precise control. Scale the vertices. Do the same with the bottom vertices. Then, in the Top viewport, select all thirteen new vertices and Non-uniform Scale along the Parent x-axis. I can't stress this enough: be aware of what reference coordinate system and center you use when you scale or rotate. The settings we used kept the edges in the middle nice and straight:


    As you can see I added one more edge loop to get somewhat of a fuselage curve.

    Right, the nose is next, stay tuned.

    gh
    Mathias


  5. #5
    THE NOSE

    In the Left viewport, select the edge loop at C, hold down SHIFT and move (View x-axis) the edges towards B. As you can see SHIFT+Move extrudes edges, this is very handy, I use it all the time. The new fuselage segment will not be smooth, to correct this, go to Polygon sub object level, select all polygons and click the blank Smoothing Group button. Now the old and new polygons share the same Smoothing Group:


    In the picture you can see I've scaled the vertices at B along the Parent y-axis to make them fit the drawing. Like I did with C, I scaled per top and bottom half and used Use Transform Coordinate Center.

    Right, so what do we do now; extrude and scale a dozen times to get the cockpit section and the nose? No, it'll produce a mesh that gets very dense near the tip of the nose which can easily foul up shading. It's also quite hard to do well so let's use a more elegant solution.

    In the Back viewport, create a box roughly the size of the nose, right-click it and convert to Editable Poly. If you need to center the box: with the Back viewport active, click the Move tool and type "0" in the X type-in field at the bottom of the UI. In Display Properties, check See-Through:


    With the box selected, check Use NURMS Subdivision in the Subdivision Surface rollout; our box changes into a squashed ball (Fig. 1). What happens here is that new vertices are created at the center of each original polygon and edge. The new vertices are then connected with new edges. Subsequently, a new position is calculated for all vertices. For more information see: http://symbolcraft.com/graphics/subdivision/ As I understand it, Max's NURMS (Non Uniform Rational MeshSmooth) is based on the Catmull-Clark subdivision algorithm. There's more to NURMS though. For instance, in Max the original vertices and edges have Weight, with which you can influence the way things are averaged / smoothed.

    Now, since we don't want a ball we'll delete the back polygon. You'll notice that as soon as you go to polygon sub object level, the original mesh appears (Fig. 2). It acts like a control "cage"; moving its edges and vertices is a bit like moving the tangent handles on a spline. You will also observe that the subdivided mesh can't be edited directly. Next, select the top-left vertices in the Left viewport and move them down until the mesh more or less matches the drawing. Do the same with the bottom-left vertices, this time moving them up (Fig. 3) In the Top viewport, select the top four vertices and Non-Uniform Scale them along the View x-axis (Fig. 4):


    It looks promising but we need higher resolution, in fact, we need 24 edges at A. In the Subdivision Surface rollout, set Iterations to 2. This gives 16 sides. Merely moving vertices can give excellent results, too bad we need 24 edges:


    In the Left viewport, select all four vertical edges and click Connect in the Edit Edges rollout, this creates 3 new edges at the center. gmax users can use the Slice Plane (Fig. 5). Now there's 24 edges at A but the thing is rather boxy looking. To fix this we'll have to move vertices again (Fig. 6).


    Well, there you have it. The cockpit section is next.

    gh
    Mathias


  6. #6
    THE COCKPIT SECTION

    In the Left viewport, select and SHIFT+Move the edge loop at B to create a new segment, then, snap the vertices to the nose using, well, 3D Vertex Snap. Now we're able to judge edge flow, see if the nose needs one last tweak before we attach it to the fuselage and indeed, it seems the edges need to go up a bit more... or maybe not; better build both and let the best mesh win:


    Looking at where the canopy is going to be, one vertex is at the right location - that is, as seen from the left, in Top view it's a different story (Fig. 1). I'll have to move it and the one below but before I do so, I need to add another edge loop because I don't want the fuselage to start widening at C. Also, there need to be edges at the end of the canopy extension / air intake anyway. I must add that I saved a copy of the fuselage for lower LOD work and refined the belly of this one by adding some edges; otherwise the landing gear doors will look a bit too low-poly (Fig. 2). After that I can move the vertices in the Top and Back viewport (x-axis)(Fig. 3).


    The obvious location for the next edge loop is right at the canopy cross framing, where it's at its widest. I scaled the new vertices and moved them (all at once) up a bit (Fig. 4). As you can see, I'm in luck as there's an edge right where it should be, or almost; it could use a bit of tweaking I suppose (Fig. 5). The last edge loop will be at the lowest point of the canopy (Fig. 6).


    Next, I need to make another cut for the canopy. QuickSlice in concert with 3D Vertex Snap is ideal for this sort of thing (Fig. 7). Now I can simply select the unneeded poly's and delete them (Fig. 8).


    Lastly, we'll scale those three edges at an angle with the help of a Point helper object. Activate 3D Vertex Snap, and place the Point helper at the bottom vertex. I used the Left view. Then, rotate until it's at the right angle (Fig. 9). To use the Point's local coordinate system, choose Pick from the coordinate system flyout and select Point01. Make sure Use Transform Center is active when you scale (Fig. 10).


    In the Top viewport I created an edge where the canopy extension is going to be and detached (might need them later on) the polygons (Fig. 11). To finish up I removed two nose edge loops and replaced them with a single one (Fig. 12).


    The thing with the "lucky" edges gives reason for pause; it might be a good idea to carefully plan your mesh; to think through the repercussions of placing vertices on the first cross section spline... Admittedly, I often think about it a little and then just start and hope for the best... promising myself to rebuild when things get ugly.


    gh
    Mathias


  7. #7

    Yippee!

    Thank you very much, Mathias!

    The pictures had been lost from Netwings for at least 6 months (broken links since Gerard's site expired) and I for one regretted not saving the entire post beforehand.
    I'll not miss this chance!

    You hadn't saved bzhyoyo's SE5a thread, by any chance? A lot of good stuff in there...
    Tom
    __________________________________________________ ___________________________________________
    Wisdom is the principal thing; therefore get wisdom: and with all thy getting get understanding. Proverbs 4:7


  8. #8
    Quote Originally Posted by hairyspin View Post

    You hadn't saved bzhyoyo's SE5a thread, by any chance? A lot of good stuff in there...
    Unfortunately not, though I think I should have the propeller writeup somewhere.
    Mathias


  9. #9
    Thank you Mathias. I have reviewed this several times since it was originally posted and am happy that you had preserved it.
    Milton Shupe
    FS9/FSX Modeler Hack

    My Uploads at SOH - Here
    Video Tutorials - Gmax for Beginners

  10. #10
    Thanks... I've saved and zipped this thread complete with images, etc.
    Felix/FFDS

  11. #11
    Dang, would a moderator please be so kind and edit post #12.
    The first image should be named "wt1.jpg", not wt2.
    Sorry for that.

    http://www.classics-hangar.de/privat...d_tuto/wt1.jpg
    Mathias


  12. #12


    Don't forget about this one. The loft technique is cool if you can get it working properly.

  13. #13

    Images have gone west again

    Mathias hasn't been around a while and the images have been lost again, so I've uploaded an old PDF of this tutorial to the Library.
    Tom
    __________________________________________________ ___________________________________________
    Wisdom is the principal thing; therefore get wisdom: and with all thy getting get understanding. Proverbs 4:7


  14. #14

    Icon17

    Quote Originally Posted by hairyspin View Post
    Mathias hasn't been around a while and the images have been lost again, so I've uploaded an old PDF of this tutorial to the Library.
    Best idea ever! Can you hint on the 3d-gauge tutorial?

  15. #15
    'Fraid not – Mathias never did post the 3D gauge tut. If you have questions on that, a new thread on 3D gauges would be an interesting idea.
    Tom
    __________________________________________________ ___________________________________________
    Wisdom is the principal thing; therefore get wisdom: and with all thy getting get understanding. Proverbs 4:7


  16. #16
    Kurier auf Stube...pauke! NachtPiloten's Avatar
    Join Date
    Jun 2005
    Location
    Leland, North Carolina, USA
    Age
    66
    Posts
    2,007
    Quote Originally Posted by Mathias View Post
    In the following I'm reposting Gerard's tutorial here that has been available at Netwings. Netwings apparently is no longer and as most of you know Gerard has passed away early this year. so before it all gets lost.....
    Did not know he passed away.

  17. #17

  18. #18
    thanks for posting that thread again, Mathias. I rue the day I haven't saved to my HD the many threads with a wealth of information at Netwings. I just bookmarked some of them but now they seem to be gone forever.
    Such a shame Gerard couldn't make it to the end of the tut: it would have been the definitive modeling tut for flight sims. Such a great loss for our community.

    Stump, if you ask me what you'd like to have posted from my SE5a thread at Netwings, I may have noted some of the tips I received there (and for that I'm really grateful).

  19. #19
    Well, as memory serves there was some discussion of textures/materials for gauges in the VC?
    Tom
    __________________________________________________ ___________________________________________
    Wisdom is the principal thing; therefore get wisdom: and with all thy getting get understanding. Proverbs 4:7


  20. #20
    Neil is out of hospital and there is hope Netwings will reappear:- http://www.sim-outhouse.com/sohforums/showthread.php?t=16654

    All aspiring modellers should be able to raid bzhyoyo's posts at will! And a great deal more besides...
    Tom
    __________________________________________________ ___________________________________________
    Wisdom is the principal thing; therefore get wisdom: and with all thy getting get understanding. Proverbs 4:7


  21. #21
    Jo, great news!
    Guess it's time to update that 3d gauge tutorial then.
    Mathias


  22. #22
    Quote Originally Posted by Mathias View Post
    Guess it's time to update that 3d gauge tutorial then.
    Yes please!
    Tom
    __________________________________________________ ___________________________________________
    Wisdom is the principal thing; therefore get wisdom: and with all thy getting get understanding. Proverbs 4:7


  23. #23
    I'm going to bump this one again. There are more clever things squirrelled away here than in a shelf of Dummies books. Snapping for one - I've just tumbled to it.

    Thanks again, Mathias!
    Tom
    __________________________________________________ ___________________________________________
    Wisdom is the principal thing; therefore get wisdom: and with all thy getting get understanding. Proverbs 4:7


  24. #24
    Is there any news about a possible version of the subject "how to create and animate the 3D gauges" ?

    This would allow me to integrate in the development of my Jodel DR-1050.

    Excuse me about my clumsiness as the date of 2009. :redf:

    And again a big thank you for this tutorial on modeling.

  25. #25
    Thank you, Mathias.

    The tutorial is excellent.
    Gerard was very kind to pass on this information to everyone.

    I will tuck it away for reference. I know it will be very beneficial for me.
    I'm just beginning the modeling journey.

Members who have read this thread: 9

Bookmarks

Posting Permissions

  • You may not post new threads
  • You may not post replies
  • You may not post attachments
  • You may not edit your posts
  •