
ad also this one,from The Aviator movie, https://flightsim.to/file/67970/gas-...arney-airlines


ad also this one,from The Aviator movie, https://flightsim.to/file/67970/gas-...arney-airlines
Nice work on these paints!!!!!
I love the Stearman.
Although I don't have MSFS ( still with FSX:SE ) , I do get to fly Stearman 203 in real life ....
if no one do this,i will try!Originally Posted by PeteHam

wish i can fly in real,you must be lucky

you lucky man!
I can only hope you like my version...
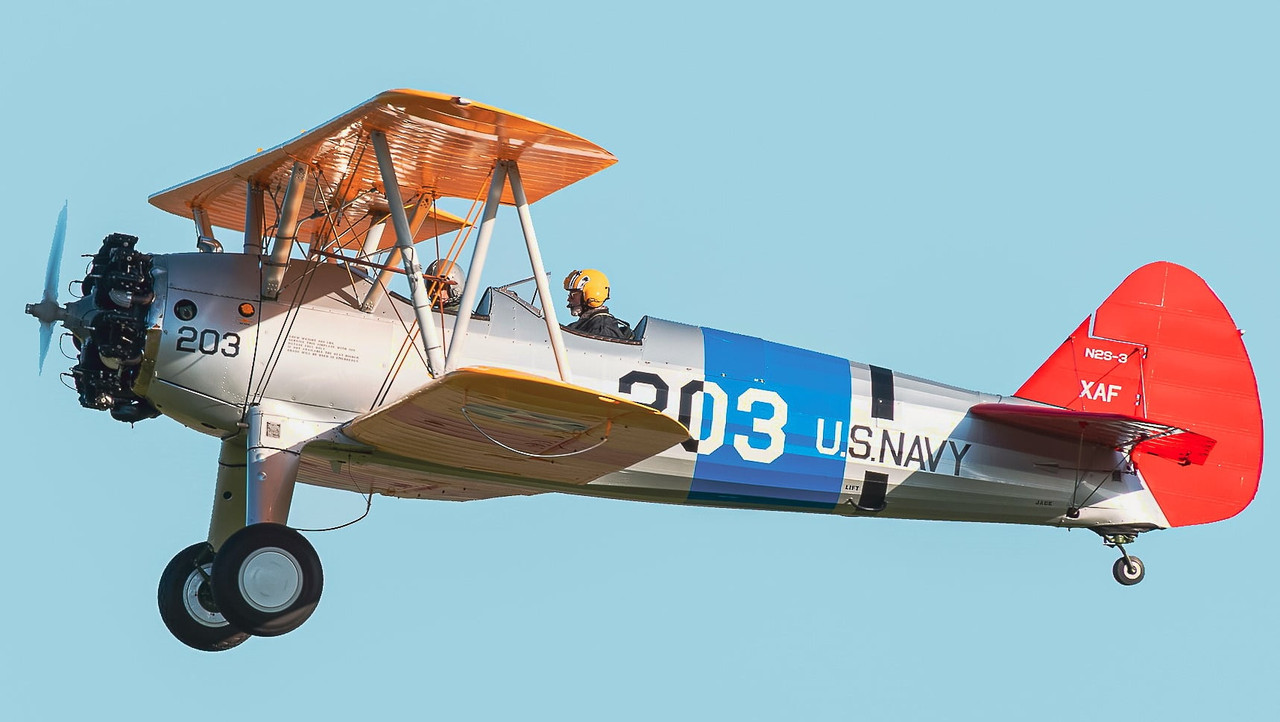
XAF (0001) by JanKees Blom, on Flickr
You can find most of my repaints for FSX/P3D in the library here on the outhouse.
For MFS paints go to flightsim.to
look´s great,save me time
GAS Stearman F-AZM,can be found here https://flightsim.to/profile/easyraider1960
work in progress:
Screenshot (2503) by JanKees Blom, on Flickr
Screenshot (2504) by JanKees Blom, on Flickr
You can find most of my repaints for FSX/P3D in the library here on the outhouse.
For MFS paints go to flightsim.to
I've transferred the textures for LN-VAR to all 3 Stearman models. The original LN-VAR is a PT-17 with a R-670 Continantal engine and wooden propeller. The GAS PT-17 Stearman don't have option for the wooden propeller. So I choosed the PT-17 model (with pitch propeller), as that was the one most similar to the original. The red "Fire extinguisher" placard on port side is not present on the original aircraft. I've tried to remove that placard, but I am not able to do so.

Gunnar van der Meeren
MSFS 2020 Standard/AMD Ryzen 9 5900X 3.7-4.8 GHz/Corsair Vengeance LPX DDR4 3200 MHz 64GB/Asus GeForce RTX 3090 TUF OC gaming GDDR6X 24GB
you need texture
B75_COCKPIT_PARTS_ALBD.PNG
B75_COCKPIT_PARTS_ALBD.PNG.DDS
B75_COCKPIT_PARTS_COMP.PNG
B75_COCKPIT_PARTS_COMP.PNG.DDS
for this,and then it is ok,you see only a little from the parts,but get the same colour.
I used to find in P3D that GAS aircraft were amenable to AP tweaking in the .cfg files so you could get a basic Autopilot working.
I have flown the Stearman a couple of times & tried the basic keyboard AP, (Z & ALT HLD & HDG HLD), but can't get it to take yet.
I've looked in systems.cfg and there is an AP section, with "autopilot_available =1", which, I think, means an AP will work.
So, is there another line somewhere in the .cfg's I need to tweak to get an AP going??
Thanks
T43
systems cfg,
remove the ; before circuit.19 and circuit.20
circuit.19 = Type:CIRCUIT_AUTOPILOT #Connections:bus.2 #Power:0, 0, 10.0 #NamedISABLED Autopilot ; Autopilot 15W
circuit.20 = Type:CIRCUIT_GPS #Connections:bus.2 #Power:0, 0, 10.0 #NamedISABLED GPS ; AS530 45W

This paragraph [AUTOPILOT] is a basic and standard paragraph that has not been used or populated by us.
These Boeing at the time of design had no electronic equipment. Nevertheless to make a slight compromise, we added a simple two-band radio and a transponder, thats all.
If you still want to use a autopilot, the best would be to use a companion program, like ... that you can find freeware on github: https://github.com/Pomax/are-we-flying
Some ideas:
=> https://forums.flightsimulator.com/t...-own/458915/21
These lines found in the basic files of the SDK were commented by me in anticipation of future changes, without more. I have not worked on the subject and I cannot give more information.
Ok, thank you.
Not sure which words to remove, or is it the whole line, [both of them]?
T43
the lines are all in,so backup......
and you need only remove the ; before......save and done,work great for me,i use a key for alt and heading hold,one for ap on/off.
you need all 3 cfg. so pt17 18 and the a75l300.
so it must be like this!
Code:[ELECTRICAL] bus.1 = Name:MAIN_BUS bus.2 = Connections:bus.1#Name:AVIONICS_BUS battery.1 = Connections:bus.1, bus.3#Capacity:13.6#Voltage:curve.1#Name:MAIN_BATTERY ; Main Battery alternator.1 = Connections:bus.1#iEng:0#Load:curve.2#Voltage:curve.3#Name:Alternator curve.1 = 0:11, 0.1:11.5, 0.5:12, 0.9:12.3, 1:12.5 ; Battery voltage for capacity % curve.2 = 500:5, 600:15, 1000:30, 1800:40 ; Load from RPM table curve.3 = 100:10, 500:13.2, 600:13.5, 1000:13.9, 1800:14 ; Voltage from RPM table circuit.1 = Type:CIRCUIT_GENERAL_PANEL #Connections:bus.1 #Power:0.5, 1, 10.0 #Name:General_Panel ; General panel circuit.2 = Type:CIRCUIT_STARTER #Connections:bus.1 #Power:1000, 1500, 10.0 #Name:Starter_1 ; Starter 3500W circuit.3 = Type:CIRCUIT_DIRECTIONAL_GYRO #Connections:bus.1 #Power:10, 15, 10.0 #Name:Directional_Gyro ; directional gyro 15W circuit.4 = Type:CIRCUIT_STANDBY_VACUUM #Connections:bus.1 #Power: 5, 10, 10.0 #Name:STBY_Vacuum ; stby vacuum circuit.5 = Type:CIRCUIT_XPNDR #Connections:bus.2 #Power:10, 18, 10.0 #Name:Transponder ; Transponder 18W circuit.6 = Type:CIRCUIT_TURN_COORDINATOR #Connections:bus.1 #Power:10, 15, 10.0 #Name:Turn_Coordinator ; turn coordinator 15W circuit.7 = Type:CIRCUIT_AVIONICS #Connections:bus.2 #Power:20, 25, 10.0 #Name:Avionics_1 ; avionics 1 circuit.8 = Type:CIRCUIT_AUDIO #Connections:bus.2 #Power:10, 15, 10.0 #Name:Audio ; Audio 15W circuit.9 = Type:CIRCUIT_PITOT_HEAT #Connections:bus.2 #Power:30, 40, 10.0 #Name:Pitot_Heat ; pitot_heat 40W circuit.10 = Type:CIRCUIT_NAV:1 #Connections:bus.2 #Power: 4, 5, 10.0 #Name:NAV1 ; NAV 1 5W circuit.11 = Type:CIRCUIT_COM:1 #Connections:bus.2 #Power: 4, 5, 10.0 #Name:COM1 ; COM 1 5W circuit.12 = Type:CIRCUIT_LIGHT_PANEL #Connections:bus.1 #Power:10, 15, 10.0 #Name:Instruments_Lights ; panel lights (11) 15W circuit.13 = Type:CIRCUIT_LIGHT_CABIN:1 #Connections:bus.1 #Power:10, 15, 10.0 #Name:Cabin_Light_pilot ; Cabin light 15W circuit.14 = Type:CIRCUIT_LIGHT_CABIN:2 #Connections:bus.1 #Power:10, 15, 10.0 #Name:Cabin_Light_copilot ; Cabin light 15W circuit.15 = Type:CIRCUIT_LIGHT_NAV #Connections:bus.1 #Power:10, 15, 10.0 #Name:Nav_Light_1 ; nav 1 light 15W circuit.16 = Type:CIRCUIT_LIGHT_WING #Connections:bus.1 #Power:10, 15, 10.0 #Name:Wing_Light ; wing light 15W circuit.17 = Type:CIRCUIT_LIGHT_LOGO #Connections:bus.1 #Power:10, 15, 10.0 #Name:Logo_Light ; logo light 15W circuit.18 = Type:CIRCUIT_XML #Connections:bus.2 #Power:10, 15, 10.0 #Name:Aera_Tablet ;Leaving this in for content creators circuit.19 = Type:CIRCUIT_AUTOPILOT #Connections:bus.2 #Power:0, 0, 10.0 #Name:DISABLED Autopilot ; Autopilot 15W circuit.20 = Type:CIRCUIT_GPS #Connections:bus.2 #Power:0, 0, 10.0 #Name:DISABLED GPS ; AS530 45W ;circuit.21 = Type:CIRCUIT_LIGHT_BEACON #Connections:bus.1 #Power:0, 0, 10.0 #Name:DISABLED Beacon_Light ; Beacon light 28V @ 0.26A ;circuit.22 = Type:CIRCUIT_LIGHT_STROBE #Connections:bus.1 #Power:0, 0, 10.0 #Name:DISABLED Strobe_Light_1 ; strobe light 25W ;circuit.23 = Type:CIRCUIT_LIGHT_RECOGNITION #Connections:bus.1 #Power:0, 0, 10.0 #Name:DISABLED Recognition_Light ; recognition light 15W ;circuit.24 = Type:CIRCUIT_LIGHT_TAXI #Connections:bus.1 #Power:0, 0, 10.0 #Name:DISABLED Taxi_Light ; taxi light 60W ;circuit.25 = Type:CIRCUIT_LIGHT_LANDING #Connections:bus.2 #Power:0, 0, 10.0 #Name:DISABLED Landing_Light ; Landing light 95W
Last edited by Tom Clayton; January 26th, 2024 at 09:03. Reason: Added Code tags to disable emojis
lagaffe
Thank you for the clarification.
Very much enjoying the Stearman.
Only looking for an AP as have cataracts & can't stare at the screen for the duration of a long flight.
T43
Thank you.
Not sure if theface in lieu of the "D" is significant?
Removing ; is all you have to do??
T43
Update
Thank you banjoman
Finally got it to work after taking out the 2, ";", per your instructions.
I found I needed to be patient for the ALT HLD to take effect as initially it started to drop, then slowly levelled out.
Appreciate your assistance.
Now, off to find some more liveries!
T43
Great

I edited the post with the code to disable the smilies. It was the : D (without the space) that was telling the forum to use the grinning emoji.
Thermaltake H570 TG Tower
X670 Aorus Elite AX motherboard
AMD Ryzen 9 7900X 12-Core Processor
NVIDIA GeForce RTX 3070
NZXT Kraken X cooler
32GB DDR5 RAM
750 Watt PS
Windows 11 Home
thank´s
Tanks a lot banjoman1960
Gunnar van der Meeren
MSFS 2020 Standard/AMD Ryzen 9 5900X 3.7-4.8 GHz/Corsair Vengeance LPX DDR4 3200 MHz 64GB/Asus GeForce RTX 3090 TUF OC gaming GDDR6X 24GB

Looking forward to the updated 333 Gunnar! TY!!
333/LN-VAR is soon to be uploaded. I am going to keep the Fire Extinguisher placard on port side of cockpit (best result, although it is not present on the original aircraft).
Here's another local PT-17 Stearman (WIP)

Gunnar van der Meeren
MSFS 2020 Standard/AMD Ryzen 9 5900X 3.7-4.8 GHz/Corsair Vengeance LPX DDR4 3200 MHz 64GB/Asus GeForce RTX 3090 TUF OC gaming GDDR6X 24GB
 Members who have read this thread: 119
 Posting Permissions


 ISABLED Autopilot ; Autopilot 15W


Bookmarks