
 FSX
FSXGreat; happy that you can adjust for your system and options as needed.Originally Posted by expat

I appreciate that you came back to report.
Thanks


Great; happy that you can adjust for your system and options as needed.
I appreciate that you came back to report.
Thanks
Looking mighty fine now in P3D4! Just wonderful to have this one flying again.
host image
is fallout 3 better than new vegas
Striker, listen, and you listen close: flying a plane is no different than riding a bicycle, just a lot harder to put baseball cards in the spokes.
Looking good there Expat!
Great shots! BTW, Maarten also did the PJ-AKB livery that I did not include due to sheer number of liveries included.

I've been out of pocket with health issues for a few weeks now and today is the first day in quite a bit that I actually feel human again (the flu that wouldn't die). Thanks Milton for the release! Looks like the paint booth is about to go back into business.
Let Being Helpful Be More Important Than Being Right.
Hey Wily great to see you back in action again and thanks for your terrific Lodestar paints!
Welcome back to daylight and virtual reality.
Thanks for contributing to this project; the liveries are great. :-)
The docs mention hi and low blowers (superchargers). Are there any in this model?
No, they are not. The performance is however included in the flight model.
Probably better here....
As ever a "kick it out of the park" production from Milton et al. Many thanks for a model that is a delight to fly.
I have one small query / problem. Trying to set the ADF frequency it would be helpful if there was a tool tip on the plus / minus hot spots showing the frequency set. I find the dials are very blurry and the only way I can see the frequency is to mouse over the dial and then mouse back to the frequency shift hot spot which makes the whole process very slow. (Or have I missed something?)
John,
You are correct of course. I did not have a panel/gauge programmer for this project; had to cobble things together myself so we ended up with this situation.
The shift+2 radio popup window is much better to use but the lack of tool tips on the fine tuning is still an issue.
I'll look again to see if I can add those tool tips, or maybe get help from one of the gurus.
EDIT: I think a better idea is to replace all the radios with the ones I use in the D18S. I am looking at that now.
Last edited by Milton Shupe; January 7th, 2019 at 08:44.

Awesome job Milton!
I've only had literally 15 min of sim time this weekend, and so it went to your Lockheed 18 - I'm really stoked about this project. I'll read the manual in more detail when I have some time, but I glanced at it and couldn't find how to address these little observations:
1) pilot figures - I have none, on any of the half-dozen or so schemes/configurations I sampled.
2) Lights on mainwheel landing gear struts - what turns those on/off? Landing light switch in the VC toggles the other landing lights, but not those. "L" of course does, but I obviously would want to selectively handle landing vs all other lights.
I apologize in advance if there are manual references that I missed.
Separate from these, I believe I recall you said the Canadian Pacific and/or the Trans-Canada paints would be included. If not, I guess I might add the older versions back that way - assuming no changes to mapping, etc. No biggie, as you've got the Pan Am one, the other of my three faves.
Again, thanks for this amazing project, it's lovely. The accuracy of the physical model, flight handling, landing gear details are just superb. A keeper by a long shot
DL,
The light switches are overhead.
Pilot visibility is based on the Battery on/off.
Lights on the wheel struts are taxi lights. The switch is next to the landing lights overhead.
Use the overhead light switches to control all the lights.
The nose light is a recognition light.
There is also a wing ice light on the left side of the fuselage, also on the overhead switches group.
I did not include those liveries because I had so many already. The original textures will work but all you need is the exterior body panels out of their folders. Use the other livery folders as a guide to which ones you need.
Thanks, Milton. I hadn't tried the shift+2 option: that works perfectly well enough for me!
Okay Sir; will leave it there then.
For anyone who wishes a better radio pop up set, the Radio set from the D18S ( [window01] ) works very well.
Just copy that 2D window over for a pop up; leave the VC as is. Copy the gauge .cab file as well - ST_D18.
The VC radio clarity is an issue of Vcockpit04 texture hi-pixel size and resulting small size then required for the radios makes for clarity issues.
Last edited by Milton Shupe; January 7th, 2019 at 14:44.

All good on my flight today, Milton
Charlie Awaiting the new Microsoft Flight Sim and will eventually buy a new computer. Running a Chromebook for now!
Thanks Milton,
I knew the switches were overhead - but the VC perspective caused me to mis read which light switch label aligned with which switch. Looking at it with more time to evaluate, all is now well with the switches.
I added in Willy's CPA paint, and with correctly aliasing the texture.cfg, now I'm all sorted for that one. I looked and couldn't find a TCA paint - I must have been confused, there must only have been a CPA insofar as 40s/50s era civilian Canadian schemes. No worries, the CPA is lovely and will suit me fine.
Out of curiosity, I loaded a few others, and the United scheme has a nice lighter cockpit texture that appeals a bit more, so now I've got the Lodestar perfectly tailored.
Thanks Milton and all the other repainters and contributors. A lovely project that will get some serious air time.
Cheers,
dl

dl, there is indeed a TCA postwar paint
https://www.flightsim.com/vbfs/fslib...ght&fid=186786
if the link doesn't work, a search on FlightSim for ' TCA Lodestar ' should pop it up. Alternatively search - Jeremy Oreskovich
"To some the sky is the limit. To others it is home" anon.
Anyone who has never made a mistake has never tried anything new. -Albert Einstein
Outstanding SrG - much appreciated. My "hoped for" triad of classic airline preferences (PAA, CPA, TCA) is complete, on as lovely a short-haul smaller liner as one could hope for.
Thanks again to all!
dl
Just found this video tonight.... Maybe we can persuade Milton to make a Tri Gear Howard 250?
You can't take the sky from me...
Thanks Brian, Six Wrights, three aircraft in mint condition!. On my "WOW" factor meter of 1 to 10, definitely a 12!! (and another museum to add to long, long list)
"Been there, tried that . ." LOL !!Maybe we can persuade Milton to make a Tri Gear Howard 250?
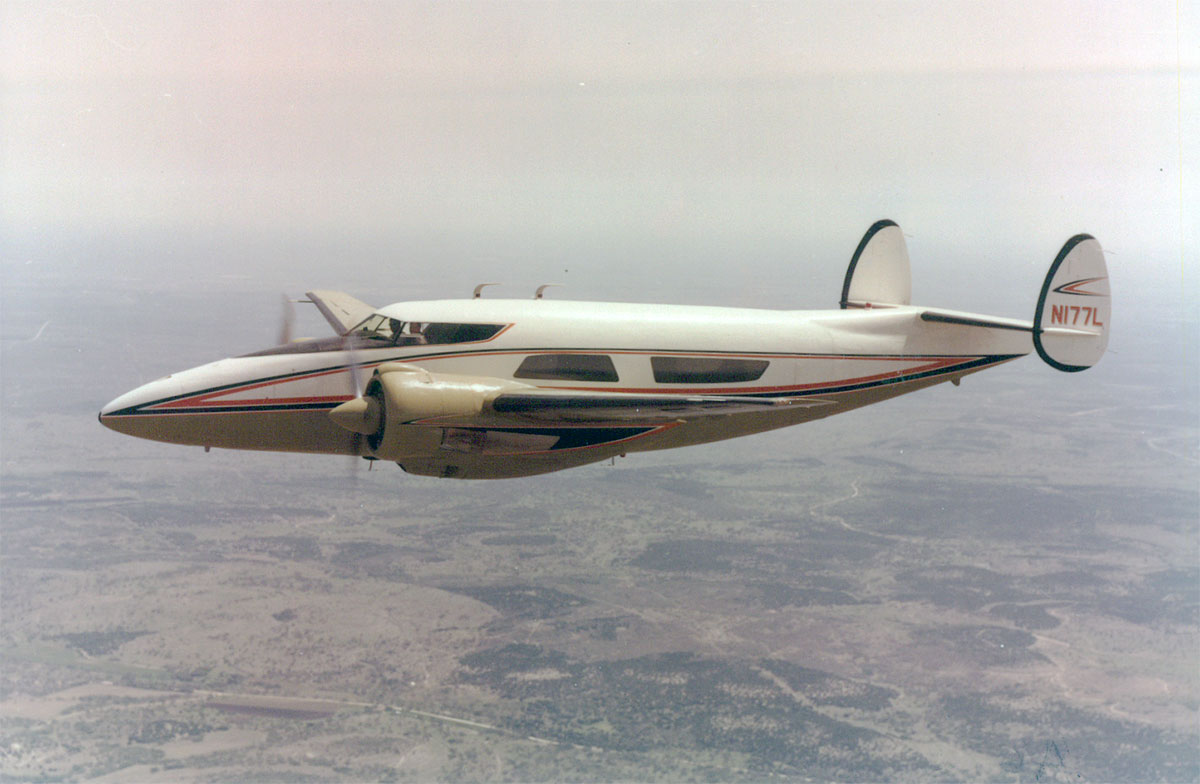
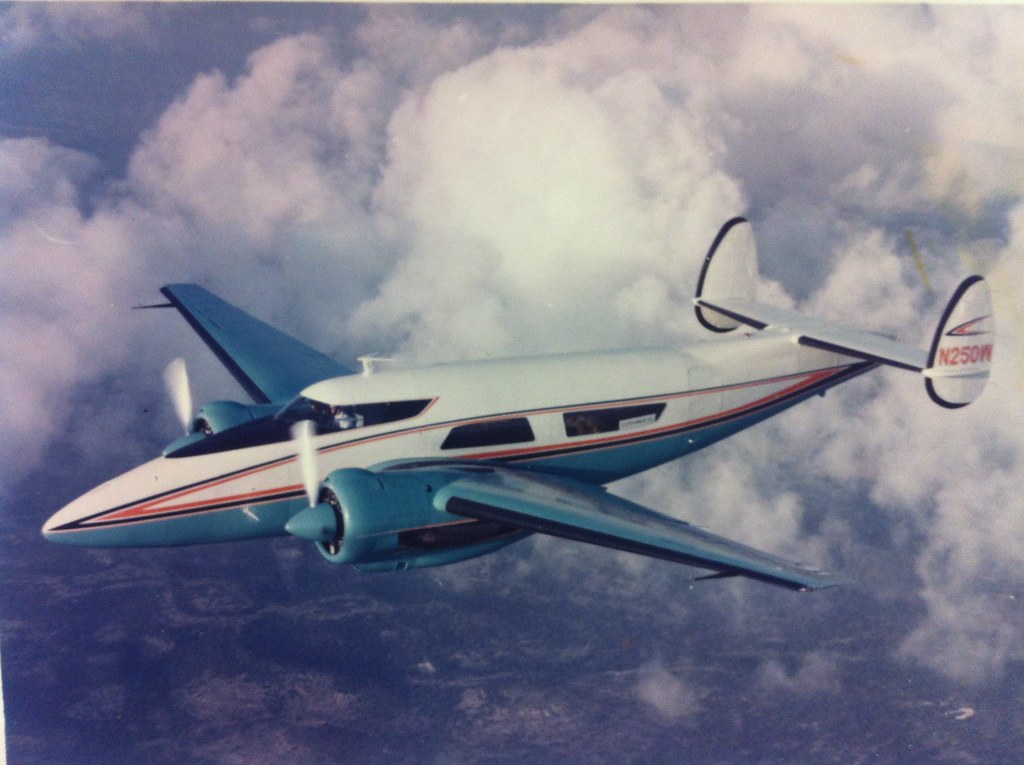
It is IMHO the purdyest, coolest looking Lockheed Twin around.


Hello,
I just downloaded this beautiful aircraft pack and all is well, except for some missing VC textures.
In a lot of the 'repaints' I am finding that the textures for the pilot seat, co-pilot seat, pilot and co-pilot yokes and yoke stands, and some of the trim around the side and front windows of the cockpit all show up as 'black' (ie. missing texture). I installed as per directions in the package and not aware of what can be causing this. Does anyone have any ideas, please ? The 'Texture.NAC' repaint shows all complete and is the only one that I am aware of with the pilot and co-pilot seat textures showing up correctly - it also has some additional 'dds' files present in it's folder. I don't want to play with these for fear of messing things up, ....they seem to refer to cabinfloor, cabinseats, cockpitwalls and cabinwalls.
Here, for example is what the VC from the 'Western Airlines' repaint shows up as :
Thank-you, in advance, for any help.
MZ
Cheers, MZee ...
W11, Ryzen 9 7950X3D, GeForce RTX 4090 AERO OC, ROG Strix X670E-A Gaming, G.Skill Trident Z5 Neo RGB DDR5-6000 CL30 AMD EXPO 32GB (2), Kraken Z73 360mm, Lian Li UniFan SL120 V2 (10), Samsung 990 PRO PCIe 4.0 NVMe 2TB (4), MEG Ai1300P, Lian Li O11D XL, Logitech Z906 5.1, T16000M FCS HOTAS, Xbox Controller, Acer Nitro XV282K 4K UHD LED.
All white "Arctic" build.
Not seeing any missing textures MZ on my end but the default texture folder yoke stem examples of parts_t and cabinseats has the cockpit seats quite dark. You can select lighter examples from other liveries like PAA or KLM.
You could also copy the parts_t from the Santa Fe livery temporarily until Willy can add the yoke stem and wheel to the Western livery parts_t.
Try the cabinseats texture from Ferondoe's TAA livery for a lighter cockpit seat arrangement.
My textures for the Western Airlines Lodestar look fine!

Charlie Awaiting the new Microsoft Flight Sim and will eventually buy a new computer. Running a Chromebook for now!
 Members who have read this thread: 2
 Posting Permissions


Bookmarks