
 FSX
FSX
Well done sir..!Originally Posted by ferondoe

Will we get a chance to fly these beauties..?

Well done sir..!
Will we get a chance to fly these beauties..?


I know it probably doesn't seem like it but I really am working on this, and ever so slowly making some progress. It just take me a while to really trash a paint job! Plus, I also had to remove the lower package guns as 'Punkin' didn't have 'em!

Duckie
"I hate to see you go, but I love to watch you leave!"

Intel i9-9900K; Noctua NH-D15 Chromax Cooler; Gigabyte Z390 Aorus Pro WiFi;
ASUS Dual RTX 2070 Super OC EVO; Corsair Vengeance LPX 32 GB 3200;
WD Black 500GB PCIe M.2 SSD; 3 Samsung 860 EVO SSD; WD Black 2TB HDD;
Corsair RM 850x Gold Full Modular PSU; Phanteks P600S Mid Tower; Win10 Pro
My SOH Downloads: http://www.sim-outhouse.com/sohforum...d=79620&sort=d
Hello Milton,
-Is it possible to have the animation of the turrets superior and tail, like on the A20, because it is a more undeniable?
What more does Shift + 2 command?
And strongly release the one of these beautiful textures!
Thank you for your reply!
Alain
-

looking forward to flying this bad boy is news on when some skins will be downloadable ?
Thursday, November 27 2014 I Lost My Best Friend My Uncle! He Was Amazing person He was a volunteer For Las Vegas metro Police he will be missed, I Volunteer with him Many Times With LVMPD And USFS
THOMAS CURTIS
Thursday Nov 27th 2014
==Punisher of Arizona == Thin Blue Line

Alain,
Possible, yes; probable, no.
The A-20 Havoc is a team project and I had an xml programmer who helped with a lot of custom xml functions and animations, some of which you have not yet seen.
The Marauder was not a team project; just me doing the modeling, texture mapping, panel and gauges (temporary-ish), and flight model with Tom Falley.
I released the Marauder as an SOH open project for our good people here to complete as they wish, and release separately if they wished.
Unfortunately, I can only do basic things with xml so programming the custom turret and tail gunner animations is not possible for me to do alone.
There is no shift+2 function, only shift+3 for the bomb bay doors. That was an oversight of mine. :-)
Regarding textures, I answered that in my response above.
The Marauder currently lacks interior textures for the cockpit, panel, bomb bay, nose and tail gunner's areas. If I had them, I could probably entice some of these great painters to put together a release package. :-)
Interior textures is a project in itself.
Hello Milton,
Ah ok!
This B-26 is still a great job!
Thank you for that!
Have a good day
Alain
-

Hello Duckie,
Magnificent effects of corrugated sheet and aging
how are you doing ?
Bravo
Marty
Is anyone working on interior textures and panel that would be willing to help make a full package?
Would love to assemble a full package so these guys could release some of their awesome liveries.
Hi Marty, thanks very much. Assuming you are talking about the "wrinkled skin" effect on the fuselage just aft of the cockpit and perhaps the bomb bay door area, I'm still using my FS9 techniques. That is, very subtle shades of light and dark with many trial and error adjustments in size and transparency % until it "looks" right to me. These are not in the bump files, I'm not that good with bump files.
Back at you with regard to the way your glass looks. I very much like the adjustments you made to your exterior glass areas, cockpit and bombardier glass in particular. Can you share how you made those adjustments because I like the way you have yours and would like to have mine look that way as well.
Thanks,
Steve
Duckie
"I hate to see you go, but I love to watch you leave!"
Intel i9-9900K; Noctua NH-D15 Chromax Cooler; Gigabyte Z390 Aorus Pro WiFi;
ASUS Dual RTX 2070 Super OC EVO; Corsair Vengeance LPX 32 GB 3200;
WD Black 500GB PCIe M.2 SSD; 3 Samsung 860 EVO SSD; WD Black 2TB HDD;
Corsair RM 850x Gold Full Modular PSU; Phanteks P600S Mid Tower; Win10 Pro
My SOH Downloads: http://www.sim-outhouse.com/sohforum...d=79620&sort=d
Got tired of weathering and decided to splash a little color on her. Still more weathering to do, including on the color!

Duckie
"I hate to see you go, but I love to watch you leave!"
Intel i9-9900K; Noctua NH-D15 Chromax Cooler; Gigabyte Z390 Aorus Pro WiFi;
ASUS Dual RTX 2070 Super OC EVO; Corsair Vengeance LPX 32 GB 3200;
WD Black 500GB PCIe M.2 SSD; 3 Samsung 860 EVO SSD; WD Black 2TB HDD;
Corsair RM 850x Gold Full Modular PSU; Phanteks P600S Mid Tower; Win10 Pro
My SOH Downloads: http://www.sim-outhouse.com/sohforum...d=79620&sort=d
Nice choice of color..
"It brings out her eyes"...
Hello Duckie,
I do not understand your question about the glass could you show me what you are talking about
Thanks,
Marty
Marty,
If I understand correctly, Duckie thought your glass settings had been modified from what I distributed as default.
Your glass has a better appearance than his default glass and he would like his glass to be more like your glass in appearance.
See the side by side comparison attached. Is it just the angle of the sun?
Duckie I got your message and will respond. Truth be told I did write out a lengthy response last night with an explanation, but the forum timed out and erased my message upon hitting the back button!
MACH 3 DESIGN STUDIO
Heatblur Rivet Counting Squad
Marty, sorry I was not as clear as Milton's explanation above. And, Milton, thanks very much for the clarity.
Thanks Rick. I'm standing by for your response.
On another note, my paint of 'Some - Punk - Kin' about done. Tweaking the diffuse alphas now and that will be it. Since Wellis has generously offered to do th.e interior, I'll hold my paint for an "official release" of a complete model package. Will also try to knock out a another paint or two.
Steve
Duckie
"I hate to see you go, but I love to watch you leave!"
Intel i9-9900K; Noctua NH-D15 Chromax Cooler; Gigabyte Z390 Aorus Pro WiFi;
ASUS Dual RTX 2070 Super OC EVO; Corsair Vengeance LPX 32 GB 3200;
WD Black 500GB PCIe M.2 SSD; 3 Samsung 860 EVO SSD; WD Black 2TB HDD;
Corsair RM 850x Gold Full Modular PSU; Phanteks P600S Mid Tower; Win10 Pro
My SOH Downloads: http://www.sim-outhouse.com/sohforum...d=79620&sort=d
Sorry everyone, I thought I had posted this but realized I never hit submit! 3rd times the charm!
Ok, so here's the deal with reflection:
The model file contains all the information about what materials the surfaces are made of. If it is reflective how much etc. The Exterior has 2 reflective type surfaces, the glass and the rest of the exterior. Without getting into too much detail, but we do need a little bit or you'll be swimming in confusion, here we go.
In order to alter the reflectivity of a surface, in this case the glass texture, we can do a few different approaches.
1. Global Environment texture: I currently use Bananabob's Alternate GlobalEnv map. This is a high contrast cube map (or reflection map) that gives a nice image to be reflected in the exterior surface. The default one is much less vibrant and toned way down and very plain. it's a poor reflection map for use with bare metal. But, using the default will drastically decrease the perception of reflection. See if you are using the default or Bananabob's. Chances are you might be using Bananabob's. An easy way to limit this to a single aircraft is by simply placing the default (or bananabob's) texture directly into the texture folder of the repaint you want to test. It will override the use of the main P3D/FSX texture in this way.
2. The next simplest method, would be to alter the glass texture alpha channel to a lighter side of the greyscale (making it whiter). The closer to pure black the more reflective the texture will become. P3D/FSX does this on a per pixel basis. So the alpha channel mirrors the texture per pixel in a monochromatic way. We need the inverse of the alpha, so the closer to black the pixel the more reflective that pixel. The closer to pure white, the less reflective it will be. Edit this as second attempt at reflection control.
3. Both of these previous actions edit the reflection, but do NOTHING to change the reflection angle. To do this you need to edit the corresponding Fresnel texture. The B-26 incorporates 2 fresnels. One is for the exterior. The second is for the Glass. You'll need to see which one is which. explaining how it's used is a little complex. Essentially, It's a single gradient from right to left. The Left Side represents head on viewing angle, while the going further to the right represents greater and greater off angle viewing. Playing around with the fresnel will give you all kinds of cool effects and things can be done DEPENDING on how it is coded in the model file. It can used to affect Diffuse which would make the texture transparent (which it is not on the B-26), Reflection only (which I don't think it is), Specular only (I believe this is the setting for ours), BOTH Reflection and Specular (which it is not on the B-26, and this is a bad setting as it blends the alphas of both....bad idea and WAYYYY less control as a repainter) or all three, which makes things look really funky. Unfortunately or Fortunately, however you choose to look at it. I don't think our adjusted the reflection. But I wanted to include this info as it helps to understand overall, in other situations how things work.
I would try the the first 2, and see what you get.You can try no. 3 as well, but I can't remember if it affects reflection or not. So it may do nothing for the angle of viewing. Just as a disclaimer.
Happy trails!
MACH 3 DESIGN STUDIO
Heatblur Rivet Counting Squad
PS - You can also edit the color intensity of the glass texture. The less intense the less reflective it will appear as perception.
MACH 3 DESIGN STUDIO
Heatblur Rivet Counting Squad

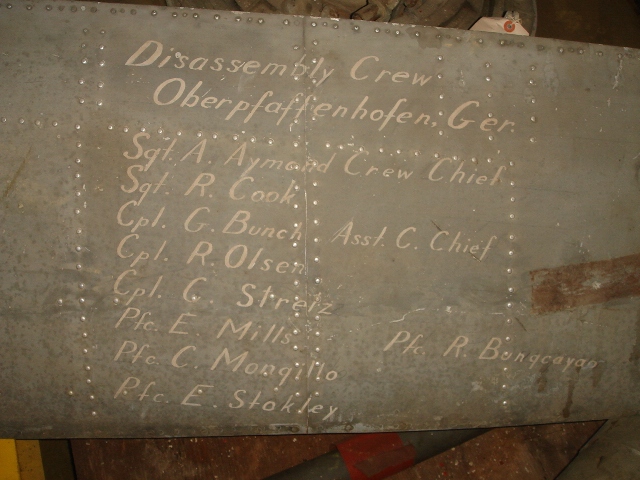
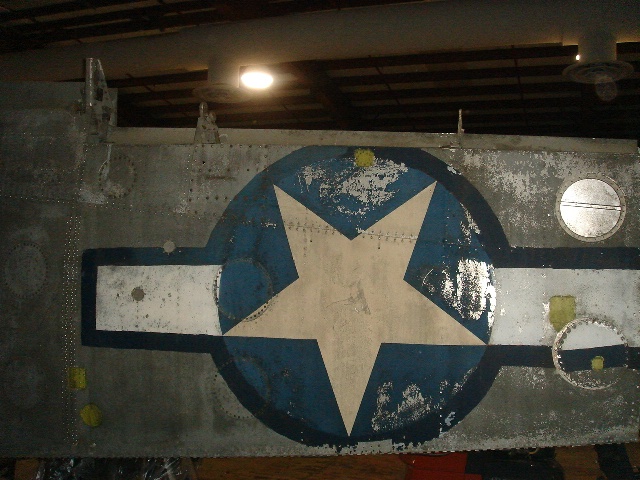
A great walk-around and explanation of the preservation and conservation work currently being done on the B-26 "Flak-Bait" at the Smithsonian, which when the work is completed, will finally be fully reassembled for the first time since the end of WWII and put on display. I had seen photos of the fuselage and wings several years ago, when they were in storage, and was amazed by the details of the invasion stripes, the stars & bars with the hand-painted outlines (red underneath the blue), all of the patches (amazingly all originally painted with yellow zinc chromate, which was rather surprising), and all of the other interesting details in the application of the markings overall, original exhaust staining still present, etc., and this video highlights some of that. I'm also really glad that they will be restoring/painting-in the areas on the nose section where the paint was worn away from the millions of visitors that just had to touch it, perhaps walk away with a paint chip or two, when the nose section was on display in Washington DC - to me, it would be hard to imagine leaving it as it is in those areas - all of the other wear & tear should remain, as it will be.
https://www.facebook.com/airandspace...4657347857797/
Some Taigh Ramey photos of "Flak-Bait", back when the majority of it was still in storage:
When the aircraft left the factory in 43, it only had the blue circle and white star. Then later, in Theatre, the white bars and red outline were hand-painted on by a mechanic. Later, the red border was hand painted over with blue.
Here, showing the star on the bottom of the right wing, note the difference in hue/tone between the factory white star (which may have been purposely darkened early on in its service) compared to the white bars added in the field. Here, the blue surround hand-painted in the field appears much darker than the factory blue paint. Note all of the yellow zinc chromate patches - according to Taigh, all of these combat repairs/patches were painted over after they were riveted in-place with a thick application of zinc chromate, applied using a brush. On the wings, there was no attempt to paint over the patches with white or blue paint to match the rest of the stars & bars.
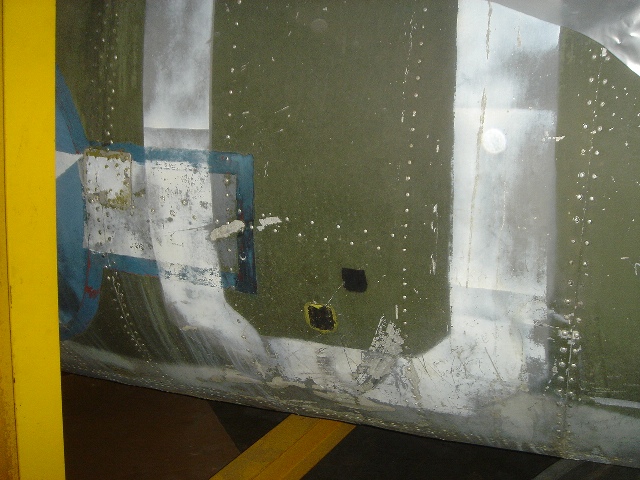
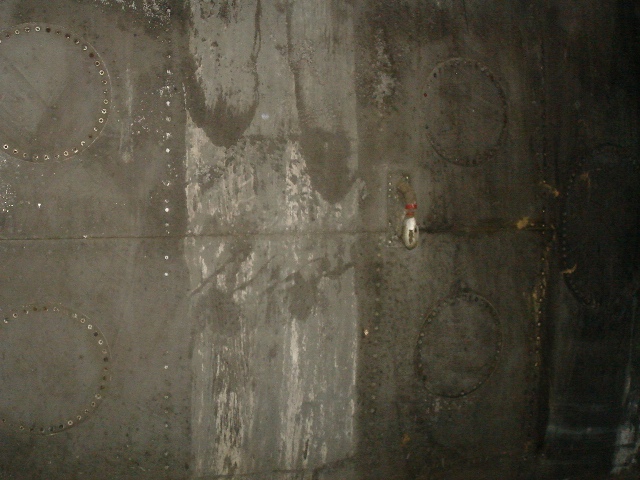
Remnants of the invasion stripes on the lower wings:
One of the landing gear doors:
Last edited by Bomber_12th; August 9th, 2017 at 12:16.
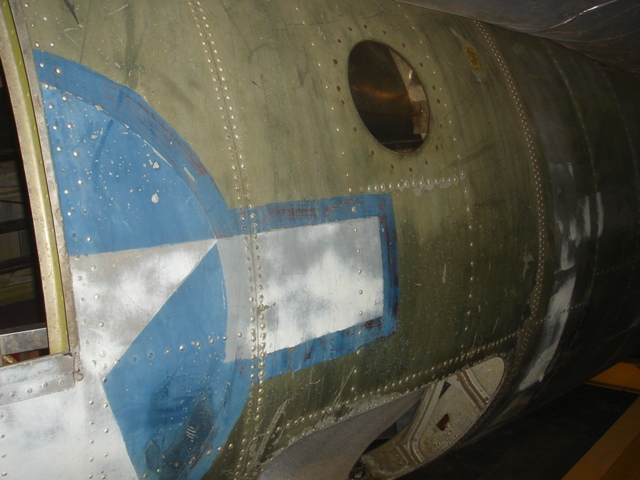
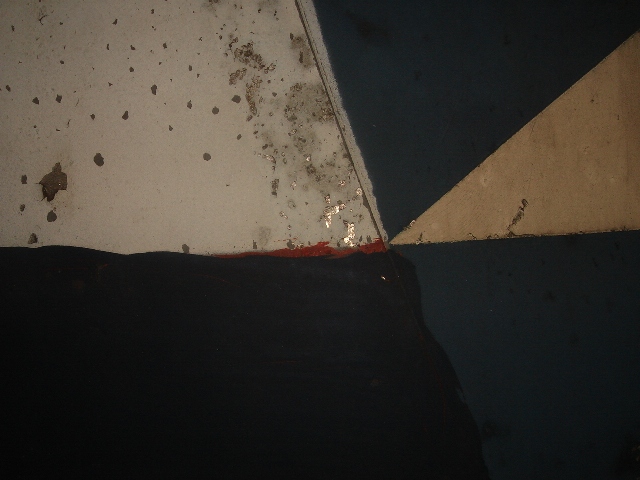
A close-up showing the original factory-applied blue circle & star, with the field-applied masked/sprayed-on white bars and hand-painted/brushed red border and later the hand-painted/brushed blue border over the red.
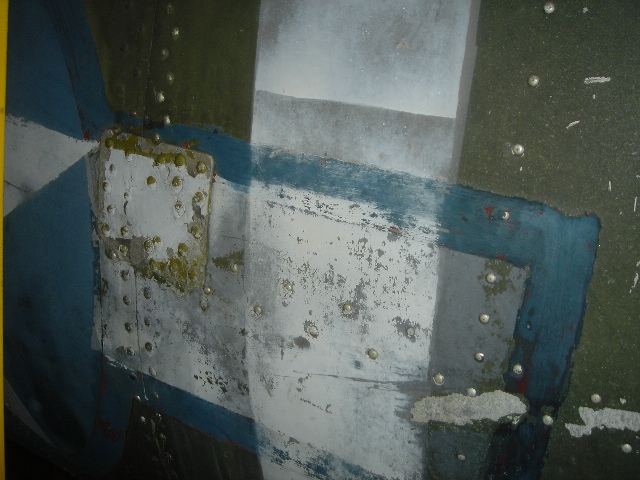
In the case of the patch seen here, white paint was applied over the top of the coat of zinc chromate to blend into the stars & bars, unlike the patches over the stars & bars on the wings.
A wider view showing the individual code letter and the way it was applied and mixed together with insignia bars added in the field.

Nice documentary and beautiful pictures John. Sometimes I wondered whether I wasn't overdoing weathering. Well obviously I wasn't.
Thanks for posting,
Huub
Thanks John! Always makes me want to go paint!
MACH 3 DESIGN STUDIO
Heatblur Rivet Counting Squad
Rick, thanks very much for taking the time to put together and post the reflection guide. I will give your instructions a go.
Duckie
"I hate to see you go, but I love to watch you leave!"
Intel i9-9900K; Noctua NH-D15 Chromax Cooler; Gigabyte Z390 Aorus Pro WiFi;
ASUS Dual RTX 2070 Super OC EVO; Corsair Vengeance LPX 32 GB 3200;
WD Black 500GB PCIe M.2 SSD; 3 Samsung 860 EVO SSD; WD Black 2TB HDD;
Corsair RM 850x Gold Full Modular PSU; Phanteks P600S Mid Tower; Win10 Pro
My SOH Downloads: http://www.sim-outhouse.com/sohforum...d=79620&sort=d
For the exterior main parts, the Fresnel Ramp affects only the "specular" (at Rick's suggestion.)
See this post for the material settings:
http://www.sim-outhouse.com/sohforum...=1#post1089620
For glass, the Fresnel ramp affects diffuse, reflection, and specular, See the glass material settings attached.
Last edited by Milton Shupe; August 9th, 2017 at 18:17.
Well, after a few hours of trial and error testing, the only thing that affects the reflectivity is of the exterior glass is the "glass_fresnel_red.dds" texture. no amount of transparency or opacity adjustment to the "cabin_glass.dds" diffuse or alpha makes any difference on the reflectivity. However, by deleting the "glass_fresnel_red.dds" the reflectivity totally goes away. The glass still has "tint" (still visible) and transparency but no reflectivity.
So, guess I'll just live with the glass the way it is originally designed. Thanks, Milton and Rick, for the help.
Steve
Duckie
"I hate to see you go, but I love to watch you leave!"
Intel i9-9900K; Noctua NH-D15 Chromax Cooler; Gigabyte Z390 Aorus Pro WiFi;
ASUS Dual RTX 2070 Super OC EVO; Corsair Vengeance LPX 32 GB 3200;
WD Black 500GB PCIe M.2 SSD; 3 Samsung 860 EVO SSD; WD Black 2TB HDD;
Corsair RM 850x Gold Full Modular PSU; Phanteks P600S Mid Tower; Win10 Pro
My SOH Downloads: http://www.sim-outhouse.com/sohforum...d=79620&sort=d
 Members who have read this thread: 2
 Posting Permissions


Bookmarks